UDL Core Foundation - Level 2
Select Your Scenario
In this credential, you will think critically on the proactive design of a real, unrefined scenario. The scenarios are not offered as model examples of UDL, but instead as a way for you to demonstrate your understanding of UDL.
The scenario may not represent the discipline or level you teach, but part of being an expert learner about UDL is the ability to demonstrate understanding of barriers and to anticipate variability using UDL in any learning experience.
You will use what you know about UDL and the UDL Guidelines to reflect on how well the design of a scenario anticipated variability and reduced barriers in connection to UDL Core Knowledge Statements.
NOTE: You may review each of the scenarios before you make your selection. Once you make your selection, you will use the same scenario throughout the credential. When you are ready to select your scenario, click the check box next to the title of the scenario.
Overview
This is a third grade ELA lesson that is intended to take one class period, approximately 45 minutes. In previous lessons, students engaged with a comprehension strategy: ask questions during reading. Now, in this lesson, learners will shift to focus on understanding the main idea of a passage. They will focus on the book When Marion Sang, a book about how a famous singer overcame obstacles in order to reach her goal. Students will craft a statement about the main idea using information from the text and from illustrations in the book.
This scenario aligns with parts of CCSS.EL-Literacy.RI.3.2 Determine the main idea of a text; recount the key details and explain how they support the main idea and CCSS.ELA-Literacy.RI.3.7 Use information gained from illustrations (e.g., maps, photographs) and the words in a text to demonstrate an understanding of the text (e.g., where, when, why, and how key events occur).
Lesson
Students will craft a statement about the main idea of the chapter using information from the text and from the illustrations of the book. This is important because it supports two ELA habits of mind: (1) to build strong content knowledge and (2) to value evidence. It also helps students understand real-world applications; for example, one could use these skills when reading their own books and when understanding content in other subject areas, and for understanding movie plots, news articles, and/or comic strips.
Goals
-
Students will demonstrate their understanding of the main idea of the chapter using information from the text and illustrations in the book.
-
"I can statement": I can share the main idea of the chapter using information from the text and illustrations.
Materials
-
When Marion Sang, cover picture (projected on whiteboard, paper version)
-
When Marion Sang Handout (digital, paper version)
-
Computer with the audio version of the text
-
Paper versions of the book
Methods
-
When students enter the classroom, the goal and "I can" statement is posted on the board.
-
Students will also be given a picture of the When Marion Sang book cover. The picture has a description and the image will be displayed on the whiteboard.
-
Students will be told: "As you begin to learn about Marion’s story, think about how this story relates to you: when was a time you had obstacles to face in order to reach a goal?"
-
Students will be shown the objective on the board and the teacher will restate it: "Your goal is to craft a statement that (1) has the main idea of the chapter and (2) that uses information from the text and illustrations of the book."

Book cover of When Marion Sang. It has a picture of Marion with her eyes closed, hands clasped under her chin, and a spotlight and stars in the background. -
The students will pair up to discuss what the goal means and to make a note of what they know or do not know yet about the book. They will spend a few minutes re-crafting the objective on the board in their own words using the When Marion Sang Handout.
-
Also on the When Marion Sang Handout, students will be prompted to answer: "What do you see, notice, or wonder about this book cover? Take a minute to jot down your ideas or discuss them with a partner."
-
There will be three ways students can read the chapter and craft their statement. They can work with partners or independently.
-
Choice 1: Read the chapter from the book and then craft their statement.
-
Choice 2: Listen to an audio version of the chapter and then craft their statement.
-
Choice 3: Have the chapter read aloud by the teacher and then work as a group using step-by-step directions to craft their statement.
-
-
Students will review the objective on the board before making their choice. On their handout, they will indicate why this choice is the best for them.
-
As students work through the lesson, they will track their progress for understanding using the prompts:
-
"What is the main idea of the text?"
-
"What information from the text supports this main idea?"
-
""What information from pictures supports this main idea?"
-
-
When students are finished, they have the option to connect some of the text to their own lives by either crafting a letter or drawing a picture to send to Marion, sharing what has resonated for them related to the main idea. They could also explore some of the vocabulary words from the chapter.
Assessments
-
As students work, the teacher will check in on the responses in their When Marion Sang Handout. If a group or an individual student is struggling, the teacher will offer support (for example, students might be prompted to remember that the main idea of a text is the most important point the author is trying to make).
-
The teacher will have a checklist of student names to be marked while walking around the room and will observe them reviewing the text and pictures to support the main idea they identified.
-
At the end of class, students will record their reflection on their When Marion Sang Handout:
-
"How well did they meet the goal for today?"
-
What is their main idea of the text and how did they use information from the text and illustrations of the book to identify that main idea?"
They can use pictures, words, and/or numbers to describe their answer. If students use the digital version of the Handout, they could record their answers verbally.
-
-
The teacher will offer feedback on students’ reflections and answers for the next class period, including any of the optional work (such as the letter/drawing to Marion and/or the vocabulary review).
Overview
This is an introductory college anatomy class that meets for 60 minutes and has over 80 students in attendance. In previous classes, students were learning about the muscular system, including understanding the differences between smooth, cardiac, and skeletal muscle. In today’s lesson, they will be focusing on skeletal muscle and applying what they learn about the physiology of skeletal muscle contraction to a case example.
This class is an introductory course available to any student on campus, but is required for pre-med, nursing students, and physical and occupational therapists. This year’s class is made up primarily of freshman, with a few sophomores and juniors. Being able to understand the physiology of muscular contraction is critical to understanding how to treat a wide range of disorders of the muscular system, including drug and physical therapy applications.
Class Session
In this class session, students will learn the basic physiological process of muscular contraction. Then, they will work in groups to try to problem-solve how to address different clinical case examples that require students to apply their understanding of the muscular physiology.
This is important because it supports the biomedical habit of mind: to use one’s understanding of complex physiological processes to make evidence-informed decisions related to case examples. It also helps students understand general skeletal muscle conditions or sports injuries that they may have experienced or heard about, such strains and contusions.
Goals
-
Students will understand the basic physiological process of muscular contraction.
-
Students will apply their understanding of physiological process of muscular contraction to analyze two muscular system case examples.
Materials
-
Skeletal muscle contraction image
-
Muscle Contraction Handout (paper and digital option)
-
Step-by-step model example and sentence-starter handout
-
Digital resources on the course website and Internet
-
Class textbook
-
Link to professor’s auto-captioned mini-lecture recording
Methods
-
The goal statements from the syllabus will be posted on the whiteboard.
-
Students will see the image of the steps of skeletal muscle contraction projected on the whiteboard and with an image description. This image is also on their Muscle Contraction Handout.
-
The professor will briefly review the key steps and students will be told: “Here are the basic steps involved in skeletal muscle contraction. These steps are important to understand so you can problem-solve disorders of the skeletal muscles.”
-
Students will be shown the objective on the board and the professor will restate it: “Your challenge is to use what you know about skeletal muscle contraction and apply it to explain what is happening in two real-life case examples.”
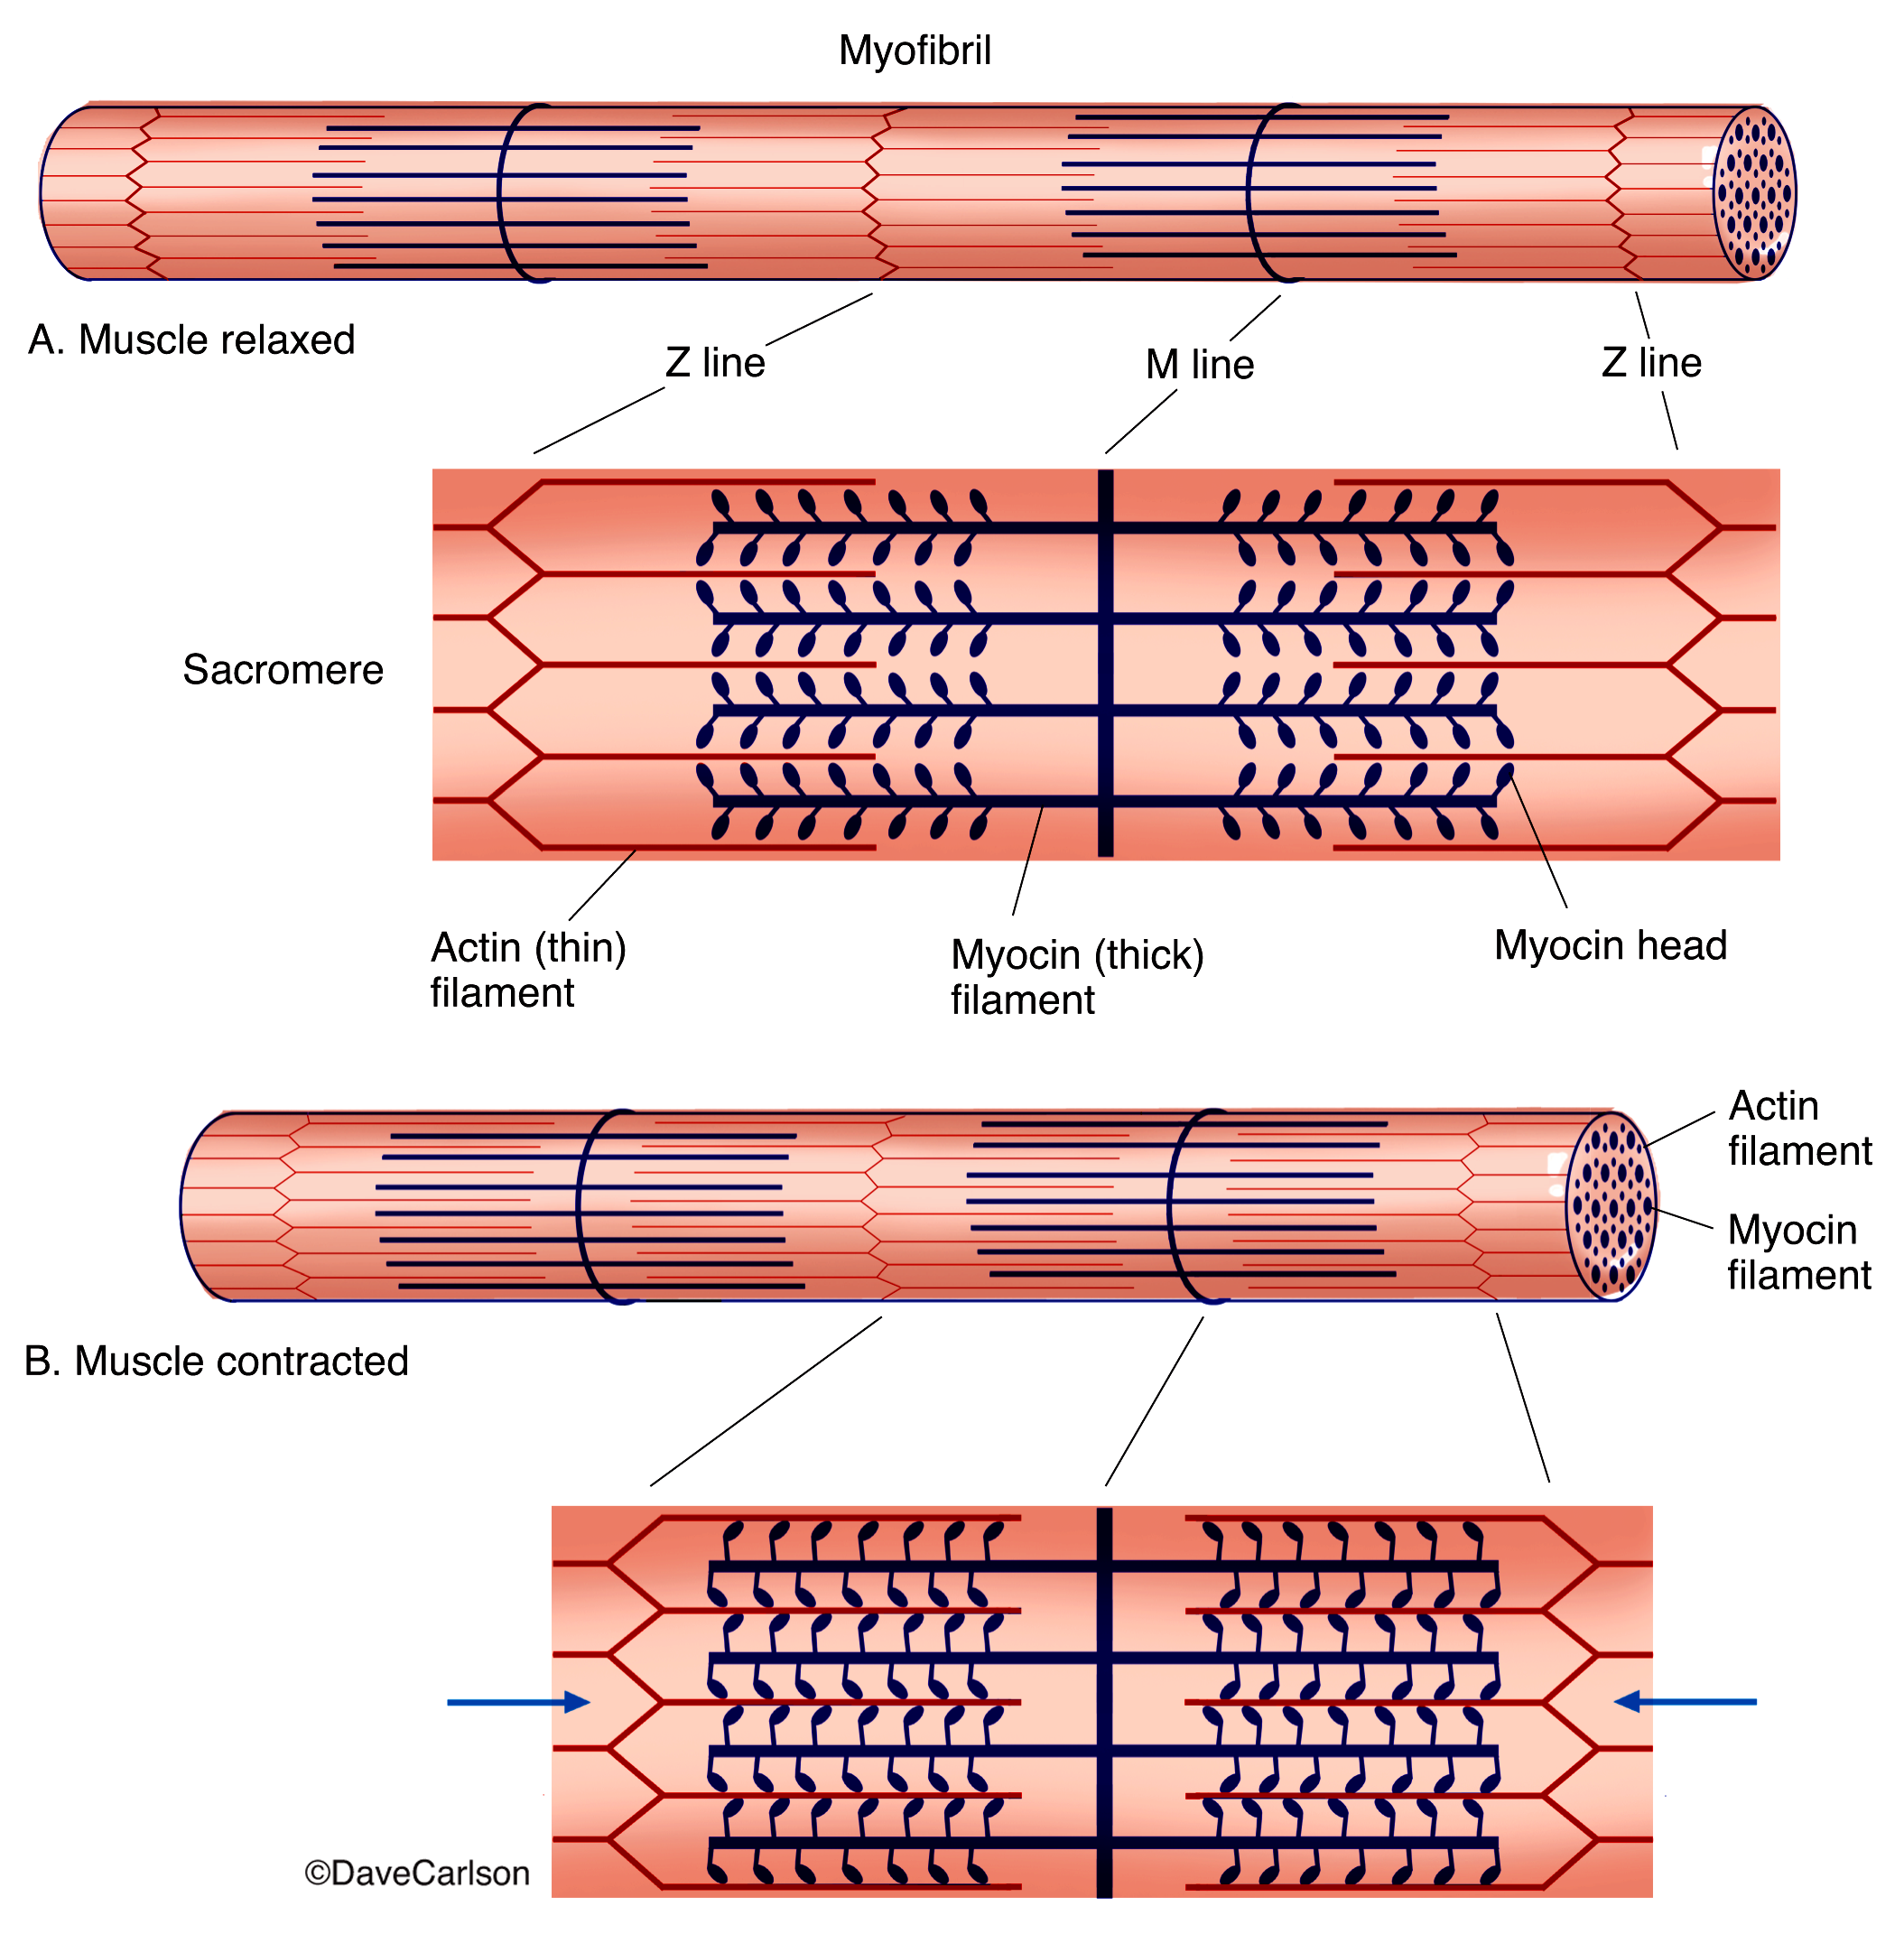
Image showing the key changes in muscular contraction, including the actin and myocin filaments. First the muscle is relaxed, showing the Z and M lines. Then it shows the muscle contracted, including the Z and M lines and myocin heads. -
The students will pair up to discuss what the goal means and to make a note of what they already know or want to know about skeletal muscle contraction. They will spend a few minutes re-crafting the objectives in their own words using the Muscle Contraction Handout.
-
Also on the Muscle Contraction Handout, students will be prompted to answer: “Use the class textbook, digital resources on our class website (including a pre-recorded, auto-captioned mini-lecture by the professor), and/or your own online research to learn more about the physiology of muscle contraction.”
-
There will be three ways students can build their background knowledge and generate diagnosis for the case examples.
-
Choice 1: Students have a discussion with a partner. They record their key ideas and solutions in the Muscle Contraction Handout.
-
Choice 2: Students can work on their own or with a partner to use sentence starters and a step-by-step model case example to generate solutions to the two clinical case examples. They record key ideas and solutions in the Muscle Contraction Handout.
-
Choice 3: Students can work on their own or with a partner to watch the professor’s auto captioned mini-lecture recording and record key ideas and solutions in the Muscle Contraction Handout.
-
-
Students will review the objective and their preparation before making their choice and will reflect why this choice is the best for them to deepen their learning.
-
As students work through the lesson, they will track their progress for understanding using the prompts:
-
“How have you developed an understanding of the key steps to skeletal muscle contraction?”
-
“How have you used that understanding to generate solutions to the clinical case examples?”
-
“How can you use this background to apply to other kinds of clinical case examples?”
-
-
When students are finished, they can read or have the text-to-speech read from an article that describes an additional clinical example that requires background understanding of skeletal muscle contraction.
-
At the end of class, the professor will pull the class together for a final summary of key ideas.
Assessments
-
As students work, the professor or teaching assistant will walk around the room and engage students in conversations to get a sense of their progress. If a pair or an individual student encounters barriers, the professor or teaching assistant will offer support (for example, students might be prompted to a specific online resource or part of the professor’s recorded mini-lecture).
-
At the end of class, students will record their reflection on their Muscle Contraction Handout:
-
“How well did they meet the goal for today?”
-
“How well did their background understanding of skeletal muscle contraction help them to generate solutions to the clinical case examples?”
They can use drawings, words, and/or numbers to share their reflection. If students use the digital version of the Handout, they could record their answers using speech-to-text options.
-
Overview
This is a high school English lesson that is intended to take one class period, approximately 45 minutes. In previous lessons, students have been analyzing writing samples that use supportive arguments to make a claim about a topic they are familiar with. In today’s lesson, they will focus on identifying evidence that supports a claim about a topic and understanding how that evidence is organized into supporting effective arguments. Subsequent lessons will focus on crafting their own claims and developing full essays using these skills.
This scenario aligns with parts of CCSS.ELA-Literacy.W.9-10.1 Write arguments to support claims in an analysis of substantive topics or texts, using valid reasoning and relevant and sufficient evidence.
Lesson
Students will analyze a piece of media (of their choice) for examples of the three main elements of a persuasive piece: claims, arguments, and evidence. They will develop a model for how these elements can be organized effectively to create a strong, persuasive piece. This is important because it supports two writing habits of mind: (1) having a strategic approach to analyzing writing and research, and (2) building formal and informal guidelines for what is appropriate and effective in a piece of argumentative writing. It also helps students understand the potential applications of persuasion techniques; for example, students could use these skills in an academic setting (when proposing a new idea to a room full of people) or in their personal lives (when trying to convince parents that they need a new, expensive video game).
Goals
-
Students will identify evidence that supports a claim and analyze how it is organized into arguments with evidence.
-
“I can” statement: I can identify the claim, arguments, and evidence in a persuasive piece and understand how they are organized to support each other.
Materials
-
Media option: article (digital or paper version), video, or podcast
-
Graphic organizer with step-by-step directions
-
Post It Notes
-
Picture of the “Argument Building”
-
Computer with auto-captioned video
-
The Claim Handout (digital, paper version)
Methods

-
When students enter the classroom, the goal and the “I can” statement will be posted on the board.
-
They will also be given a picture of the “Argument Building” image with a caption, and the image will be displayed on the whiteboard.
-
Students will be told: “Strong persuasive pieces are often made of the same three basic elements that all support each other: claims, arguments, and evidence.”
-
Students will be shown the objective on the board and the teacher will restate it: “Your challenge is to identify the claim, arguments, and evidence within the piece of media you chose, and look for patterns in how they are organized.”
-
The students will pair up to discuss what they already know about persuasive pieces, including what they know about a claim, arguments, and reasoning and how they might identify them in their chosen pieces. They will be encouraged to take note of what they know or do not know yet; then they will spend a few minutes re-crafting the objective on the board in their own words using their The Claim Handout (this handout can be either digital or paper).
-
Also, on the Claim Handout, students will be prompted to select a piece of persuasive media (article in print or digital option, video, or podcast) available from the classroom.
-
There will be three ways students can investigate their persuasive piece and they will need to turn in evidence to show their understanding either using a graphic organizer, the table on The Claim Handout, or other means. They can work with partners or independently.
-
Choice 1: Identify examples of the three elements in their pieces and use a graphic organizer to record them and record how they are organized.
-
Choice 2: Watch a captioned video and then identify examples of the three elements in their piece., and record think about how they are organized.
-
Choice 3: Use step-by-step directions to build a Post It note model of the “Claim Building.”
-
-
Students will review the objective on the board before making their choice. On their handout, they will indicate why this choice is the best for them.
-
As students work through the lesson, they will track their progress for understanding using some of the prompts:
-
“Make a list of examples of claims, arguments, and evidence in your piece, and record it.”
-
“How does the author support the arguments for their claim with arguments and evidence?”
-
“How are the three elements organized in your piece? Do you notice any patterns?”
-
-
When students are finished, they can read (or have the text read aloud) from an article that shows how effective argumentative writing can be used in law cases. The article has two bonus questions as options to think more about claims: Learn more about claim statements in court cases.
Assessments
-
As students work, the teacher will check in on the responses in their Claim Handout. If a group or an individual student is struggling, the teacher should give a hint (for example, they might be prompted to make sure that claim identified is not part of the evidence).
-
The teacher will have a checklist of students’ names to be marked as the teacher walks around the room and observes them identifying claims, arguments, and evidence, and analyzing how they are organized into a coherent, persuasive piece.
-
At the end of class, students will record their reflections on The Claim Handout:
-
"How effective was my strategy for learning today? Did I meet my goal?
-
What patterns did I notice in how the three elements were organized in my piece?"
They can use pictures, words, and/or numbers to model how claims, arguments, and evidence can be organized to create a persuasive message. If students use the digital version of the Handout, they could also record their answers verbally.
-
-
The teacher will offer feedback on their reflections and models for the next class period.
Overview
This is a middle school science assignment that is intended to take one class period, approximately 45 minutes. Prior to this lesson, students have been engaging with the structures of the cell membrane. Today, they are focusing on how water moves across a cell membrane. After this lesson, students will model this activity and set up their own independent experiment of an egg cell in a solution of their choice.
This scenario aligns with parts of NGSS MS-LS1-2. Develop and use a model to describe the function of a cell as a whole and ways parts of cells contribute to the function.
Lesson
Students will develop and use a model to describe the movement of water across the cell membrane, as a way to understand how different parts of the cell contribute to the function. This is important because it supports two important science habits of mind: to develop a model to explain what you observe and to be able to transfer that understanding to new situations. This helps us understand real world applications. For example, you could use this model to understand more about the human body, such as why one gets chapped lips or how constipation works.
Goals
-
Students will develop a model to explain how water will move across a cell membrane (osmosis)
-
The “I can” statement: I can develop a model to explain how water will move across a cell membrane.
Materials
-
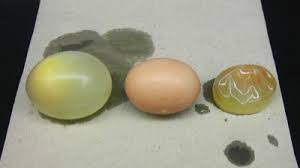
Projection and paper version of three cells picture
-
Osmosis handout (paper or digital)
-
Markers and other coloring supplies
-
Computer with an auto-captioned video.
Methods
-
When students enter the classroom, the goal and “I can” statement is posted on the board.
-
Students will also be given a picture of these eggs with a description and the image will be displayed on the whiteboard.
-
Students will be told: “Here are three egg cells. An egg is one single cell, so it is a good model for understanding cellular processes such as osmosis.
-
Students will be shown the goal and the teacher will restate it:
"Osmosis is the movement of water through the cell membrane from high to low concentration. Your challenge is to figure out which direction water moved through the cell membrane of each cell (egg) in this picture."
-
The students will pair up to discuss what the goal means and to make a note of what they know or do not know yet. They spend a few minutes re-crafting the goal in their own words on the Osmosis Handout.
-
Also on the Osmosis Handout, students will be prompted to answer:
-
“What do you see, notice, or wonder about the amount of water in these cells? Take a minute to jot down your ideas or discuss them with a partner."
-
“Make a guess of whether you think water moved in or out of each cell."
-
-
There will be three ways students can learn about osmosis. They can work with partners or independently.
-
Choice 1: Begin by crafting a model for understanding the process of osmosis using the 3 egg cells.
-
Choice 2: Watch an auto-captioned video and then craft a model for understanding the process of osmosis using the 3 egg cells (note: students have been shown how to turn on captions if needed).
-
Choice 3: Use step by step directions to craft a model for understanding the process of osmosis using the 3 egg cells.
-
-
Students will review the goal before making their choice. On their handout, they will indicate why this choice is the best for them.
-
As students work to develop their model to explain how water moves across a cell membrane, they will track their progress for understanding using the prompts:
-
“What is the reason that you think water moves in or out of each cell?”
-
"What is the cause and effect relationships between the eggs and their solutions?”
-
"What What patterns emerge that will help you predict how water will move across any cell membrane?”
-
-
When students are finished, they can read (or have the text read aloud) from an article that tells more about the process of osmosis. The article has two bonus questions as options: Chapped Lips: Do you Need Chapstick?
Assessments
-
As students work, the teacher will check in on the responses in their Handout. If a group or an individual student is struggling, the teacher will give a hint (for example, they might be prompted to remember that water moves from a high concentration to low concentration).
-
The teacher will have a checklist of students’ names to be marked as they walk around the room and observes them use the drawing to know how water moves in or out of the cell membrane.
-
At the end of class, students record their reflections on the Osmosis Handout. They can use pictures, words, and/or numbers to describe how they know their answer. If students use the digital version of the Handout, they could record their answers verbally.
-
How well did they meet the goal for today?
-
What is model to explain how water will move across a cell membrane (osmosis)?
-
-
The teacher will offer feedback on the students’ reflection and solutions for the next class period.
Overview
This is an elementary math lesson that is intended to take approximately 45 minutes. The lesson has the option to be delivered in a face to face setting (all students and teachers are in the same classroom), hybrid (some students and teachers are face to face and some are remote), or fully remote setting (all students and teachers are remote). In previous lessons, students have been engaging with number patterns that occur when multiplying numbers together. In this lesson, they will focus on patterns with square numbers (a square number is when a number is multiplied by itself, such as 4x4).
This scenario aligns with parts of CCSS.Math.Content.3.OA.D.8: Solve two-step word problems using the four operations. Assess the reasonableness of answers using mental computation and estimation strategies. It also points to the Standards for Math Practice - Modeling and Repeated Reasoning.
Lesson
Students will determine how many bowling balls are in a square pyramid by identifying repeating patterns and finding a formula instead of simply counting. This is important because it supports two math habits of mind: (1) looking for patterns & relationships, and (2) using repeating patterns to find shortcuts to solve a problem. It also helps students understand real world applications; for example, one could use these skills when constructing buildings.
Goals
-
Students will be able to identify square numbers and use them to find solutions to problems.
-
“I can statement”: I can look for square numbers and use them to solve problems.
Materials
-
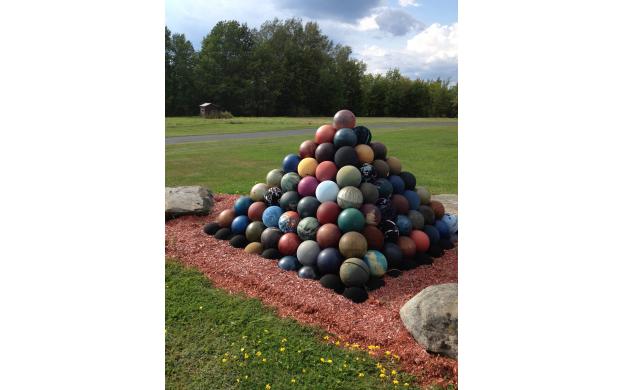
Square pyramid picture (can be projected, displayed digitally, or printed)
-
Pyramid Handout (digital or paper version)
-
Mathematics cubes or 2x2 Legos (or similar objects you may have in your learning space, such as coins or marbles)
-
Step-by-step building directions to build a square pyramid
-
Computer with bandwidth for auto-captioned video (could be in a classroom, public, or home environment)
-
Internet access that supports options for video-conferencing (such as Zoom, What’s App, Google Meet, or Teams) that can be in a school, public facility, or home
Methods

-
When students join the learning environment (either a classroom or digital learning space), the goal and “I can” statement will be posted.
-
Students can access a picture of this square pyramid image with a caption and alternative text.
-
Students will be told: “Here is a structure that was built on a school’s playground. It’s called a square pyramid.”
-
Students will be shown the objective: “Your challenge is to figure out the pattern that will help you know how many bowling balls are in this square pyramid - or any square pyramid - without counting.”
-
The students will reflect on what the goal means and to make a note of what they know or do not know yet. They will spend a few minutes re-crafting the objective in their own words using the Pyramid Handout. They have the option to pair up either in small groups (if they are in a face to face setting) or in a breakout chat room or other digital option to communicate (such as text or other video conference option) to discuss what the goal means at an agreed upon time.
-
On the Pyramid Handout, students will be prompted to answer:
-
"What do you see, notice, or wonder about how this pyramid is built? Take a minute to jot down your ideas or discuss them with a partner."
-
"Make an estimate of how many balls you think are in the pyramid and record this."
-
-
Then, there will be three ways students can learn about the square pyramid. They can work with partners or independently.
-
Choice 1: Begin by building a model of the pyramid using cubes (or similar objects you may have in your home, such as coins or marbles).
-
Choice 2: Watch a captioned video and then build the pyramid using cubes (note: students have been shown how to turn on captions if preferred).
-
Choice 3: Use step-by-step directions with a small, teacher-led group to build the pyramid with Legos, or similar objects from your home, such as coins or marbles. Note: the teacher-led group can be done remote or face-to-face.
-
-
Students will be prompted to review the objective before making their choice. On their handout, they will indicate why this choice is the best for them.
-
As students work through the lesson, they will track their progress for understanding using the prompts:
-
"What is the pattern you notice?"
-
"How does it repeat?"
-
"How can you use this to figure out the total number of bowling balls? What is the shortcut (formula)?"
-
-
When students are finished, they can read or have the text read aloud from an article that tells more about the square pyramid located near their school. The article has two bonus questions as options to solve: Learn more about the bowling-ball pyramid at this school.
Assessments
-
As students work, the teacher will check in on the responses in their Pyramid Handout (note, if this lesson is remote, the teacher can see the progress in each student’s digital Pyramid Handout). If a group or an individual student is struggling, the teacher will offer support (for example, students might be prompted to remember that a square pyramid has 4 sides or to think about whether they need to use area or perimeter formulas). Note that these “tips” can be digitally recorded.
-
Whether remote or face-to-face, the teacher will have a checklist of student names to monitor progress as they find a shortcut (formula) for the solution to the pyramid problem.
-
At the end of of the learning experience, students will record their reflection on their Pyramid Handout:
-
How well did they meet the goal for today?
-
What is their solution to the pyramid problem: how many balls are in the pyramid?
They can use pictures, words, and/or numbers to describe how they know their answer. If students use the digital version of the Handout, they could record their answers verbally.
-
-
The teacher will offer feedback on students’ reflections and solutions for the next lesson.